
Jupyter Notebooks in Visual Studio Code
Over the past couple of years, Visual Studio Code (VSC) has become my favorite Python IDE and all-around code editor. It works well for almost any programming language, has an intuitive layout, can be customized and extended with extensions, and (most importantly) it’s completely free.
One awesome Visual Studio Code feature is that it integrates very nicely with Jupyter notebooks, which is the way many programmers like to present Python code and analysis. I don’t always use Jupyter notebooks, but they are quite useful for sharing Python code and results (check out this article for more ways to run Python code in VSC). One downside is that the web interface for Jupyter notebooks lacks some features (like autocomplete, seamlessly changing between Python environments, etc.) that are common with IDEs (like VSC)
It only takes five simple steps to get Jupyter notebooks running inside Visual Studio Code.
- Install Visual Studio Code
- Install the necessary Jupyter notebook extensions
- Create a Python environment and install the Jupyter module
- Make a .ipynb file
- Write your code!
This tutorial will demonstrate how to start working with Jupyter notebooks in VSC.
1. Install Visual Studio Code
You’ll obviously need VSC installed before you can use it to create Jupyter notebooks. VSC installation is really easy. Just go to the download page, download the appropriate installer, then follow the installer prompts to complete the installation. You can keep all the default installation settings.
2. Install VSC Extensions to Enable Jupyter Notebooks
Once you have VSC installed you’ll just need to install a few extensions for VSC to support Jupyter notebooks. You’ll need to install six extensions.
- Python (author: Microsoft)
- Pylance (author: Microsoft)
- Live Server (author: Ritwick Dey)
- Jupyter (author: Microsoft)
- Jupyter Keymap (author: Microsoft)
- Jupter Notebook Renderers (author: Microsoft)
Extensions can be installed by opening the Extensions panel (click the Extensions button on the left side of VSC or press Ctrl + Shift + X), searching for the extension you wish to install, the clicking the install button.
If the required extensions are already installed, you can skip this step.

3. Create a Python Environment and Install the Jupyter Module
Now that Visual Studio Code has the functionality to create and display Jupyter notebooks you need a Python environment to use for notebook development. This is simple to do. All you need is an environment with the jupyter module installed.
If you don’t have already have an environment, you can create one with Anaconda using two simple commands.
First, create the environment.
conda create --name myenv python=3.9Second, install the jupyter module.
conda install jupyterFinally, you’ll just need to make sure that VSC knows where to find your environment so you can use it when working with the notebook. I have an entire article about integrating Anaconda with VSC that will help you do this if you run into problems.
4. Start a New .ipynb File
You now have the proper infrastructure set up for Jupyter notebooks to work with VSC. Go ahead and open up a Jupyter notebook (.ipynb) if you have one. Or, if you want to create a new one go to the VSC Explorer and create a new .ipynb file in your desired folder.
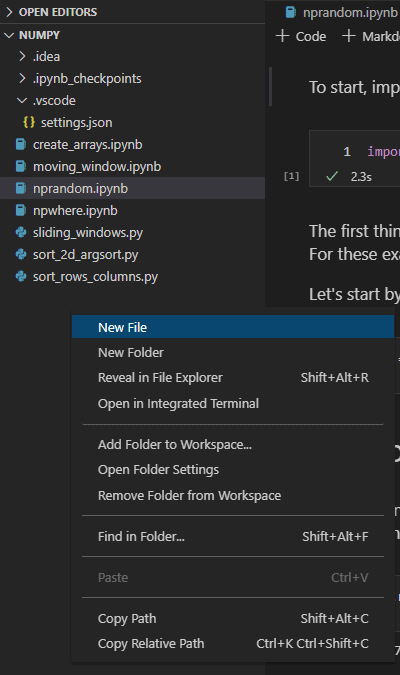
To create a new file in Visual Studio Code, right-click on a folder name in the file tree or an empty area of the Explorer panel, then select ‘New File’. Be sure to give your file the .ipynb extension.
Once you have a Jupyter notebook (.ipynb extension) open in the editor, you will see the Jupyter notebook toolbar at the top of the editor. You can also use all the Jupyter notebook shortcuts to create and edit your notebook.

5. Write Your Code!
All you have to do now is write your code and share your results!
Download a Jupyter Notebook from Visual Studio Code
You can download a Jupyter notebook as an HTML, PDF, or Python file directly from Visual Studio Code. Click the ellipsis button (3 dots . . .) on the notebook toolbar and select ‘Export’.

At the top of VSC, a drop-down menu will appear with the option to save the notebook as an HTML, PDF, or Python script. Select your desired format and specify the save location.

Conclusion
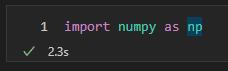
I don’t always use Jupyter notebooks, but when I do it’s great to create them in Visual Studio Code where I can easily access the rest of my code base and have files open in other tabs. VSC has also done a really nice job with notebook styling. The markdown styling is clear and easy to read. I also like how each code cell displays a checkmark with the execution time after it’s been run. Integration of Jupyter notebooks with Visual Studio Code has made me use the notebooks more often.
Whether you’re looking to take your GIS skills to the next level, or just getting started with GIS, we have a course for you! We’re constantly creating and curating more courses to help you improve your geospatial skills.


All of our courses are taught by industry professionals and include step-by-step video instruction so you don’t get lost in YouTube videos and blog posts, downloadable data so you can reproduce everything the instructor does, and code you can copy so you can avoid repetitive typing