PyQGIS: Loading and symbolizing vector layers
Objectives
- Load and symbolize a vector layer with pyqgis
- Apply basic and graduated symbology
Open the QGIS Python Console
From the menu, select Plugins -> Python Console, or Ctrl + Alt + P (Windows)
You can type directly into the console, or select the pad and paper icon to write code in the editor. I prefer to write code in the editor because it allows me to save my work and run a compilation of commands.
Load a vector layer
Define the path to a shapefile
In the code editor, or console, create a variable containing the path to your raster file.
fn = 'c:/path/to/shapefile.shp'
Load vector layer into QGIS interface
Now we’ll simultaneously assign the vector layer to the layer variable and load it into the QGIS interface. We need to provide a layer and data provider. In this case I leave the layer name empty (the layer name will be the file name), and set the data provide to 'ogr'.
layer = iface.addVectorLayer(fn, '', 'ogr')
This adds the layer into the QGIS interface with default symbology. We’ll change the symbology next.

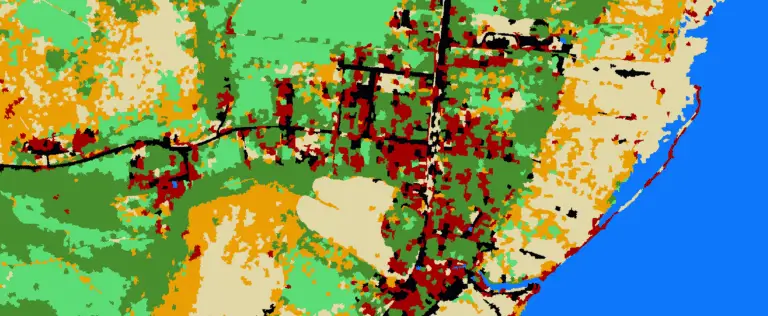
Layer with default symbology.
Change vector symbology
Basic symbology
I have loaded a shapefile containing line geometries. There are slightly different methods for changing symbology for lines, points, and polygons. I’ll focus on methods for lines but make mention of what to do for points and polygons.
Let’s change the default line symbology to a dashed, red line. To do this, we’ll create a new symbol, apply it to the layer renderer, then repaint the layer.
# create a new symbol
symbol = QgsLineSymbol.createSimple({'line_style': 'dash', 'color': 'red'})

# apply symbol to layer renderer
layer.renderer().setSymbol(symbol)

# repaint the layer
layer.triggerRepaint()
The steps for changing the basic symbology of point and polygon layers are the same. You just need to call the appropriate symbol. For example, instead of calling QgsLineSymbol, you would call QgsMarkerSymbol (for points), or QgsFillSymbol (for polygons).

Layer with updated symbology.
Symbology properties
You may find it useful to view basic symbology properties. This can be done by accessing the symbol properties in the layer renderer as follows.
print(layer.renderer().symbol().symbolLayers()[0].properties())

#output
{'capstyle': 'square', 'customdash': '5;2', 'customdash_map_unit_scale': '3x:0,0,0,0,0,0', 'customdash_unit': 'MM', 'draw_inside_polygon': '0', 'joinstyle': 'bevel', 'line_color': '152,125,183,255', 'line_style': 'solid', 'line_width': '0.26', 'line_width_unit': 'MM', 'offset': '0', 'offset_map_unit_scale': '3x:0,0,0,0,0,0', 'offset_unit': 'MM', 'use_custom_dash': '0', 'width_map_unit_scale': '3x:0,0,0,0,0,0'}
Graduated symbology
Now let’s apply graduated symbology to the layer. This will symbolize different lines with different colors based on the values of a field in the shapefile.
Open shapefile
To apply graduated symbology we need to open the shapefile in slightly different way than described above. This method will not immediately add the layer to the QGIS interface. We’ll use QgsVectorLayer to open the shapefile, and give it arguments of filename, layer name, and data provider, as above.
# open shapefile
layer = QgsVectorLayer(fn, 'name', 'ogr')
Print fields in layer
You may find it useful to print the names of the fields in your shapefile. This can be done by looping through the layer fields as follows.
for field in layer.fields():
    print(field.name(), field.type())

# output
Id 4
iGeo_ElMax 6
iGeo_ElMin 6
iGeo_Len 6
iGeo_Slope 6
iGeo_DA 6
iVeg_100EX 6
iVeg_30EX 6
iVeg_100PT 6
iVeg_30PT 6
iHyd_QLow 6
iHyd_Q2 6
iHyd_SPLow 6
iHyd_SP2 6
oVC_PT 6
oVC_EX 6
oCC_PT 6
oCC_EX 6
totdams 2
totcomp 2
I’m going to symbolize based on the ‘totdams’ field, which gives an estimate of the number of beaver dams that could potentially be built on a stream reach. Values in this field range from 0 to 11. I want to differentiate stream reaches that could support more than 5 dams.
Create graduated symbology
In this section we’re going to use color definitions from PyQt, so add from qgis.PyQt import QtGui to the list of imports. You can follow the repo link at the top of this page to see how I’ve done this in my script.
Set symbol variables
Let’s define the field we want to use, and a list that will set the value ranges for the different symbology definitions. We’ll also set the symbol opacity
targetField = 'totdams'
rangeList = []
opacity = 1
Create first symbol
Now we’ll create the symbol for reaches that could support 0-5 dams. We’ll symbolize this with a yellow color. We’ll define the value range for the symbol, a label, and a color. Then add the symbol, its range, and label to the rangeList.
# define value ranges
minVal = 0.0
maxVal = 5.0

# range label
lab = 'Group 1'

# color (yellow)
rangeColor = QtGui.QColor('#ffee00')

# create symbol and set properties
symbol1 = QgsSymbol.defaultSymbol(layer.geometryType())
symbol1.setColor(rangeColor)
symbol1.setOpacity(opacity)

#create range and append to rangeList
range1 = QgsRendererRange(minVal, maxVal, symbol1, lab)
rangeList.append(range1)
Create second symbol
Let’s create the symbol for the second group, stream reaches that could support 5-11 dams. We’ll symbolize these reaches with a cyan color.
# define value ranges
minVal = 5.1
maxVal = 12.0

# range label
lab = 'Group 2'

# color (yellow)
rangeColor = QtGui.QColor('#00eeff')

# create symbol and set properties
symbol2 = QgsSymbol.defaultSymbol(layer.geometryType())
symbol2.setColor(rangeColor)
symbol2.setOpacity(opacity)

#create range and append to rangeList
range2 = QgsRendererRange(minVal, maxVal, symbol2, lab)
rangeList.append(range2)
Display the layer in QGIS
Finally, we’ll set the layer renderer and display it in QGIS.
# create the renderer
groupRenderer = QgsGraduatedSymbolRenderer('', rangeList)
groupRenderer.setMode(QgsGraduatedSymbolRenderer.EqualInterval)
groupRenderer.setClassAttribute(targetField)

# apply renderer to layer
layer.setRenderer(groupRenderer)

# add to QGIS interface
QgsProject.instance().addMapLayer(layer)
And our layer is symbolized!

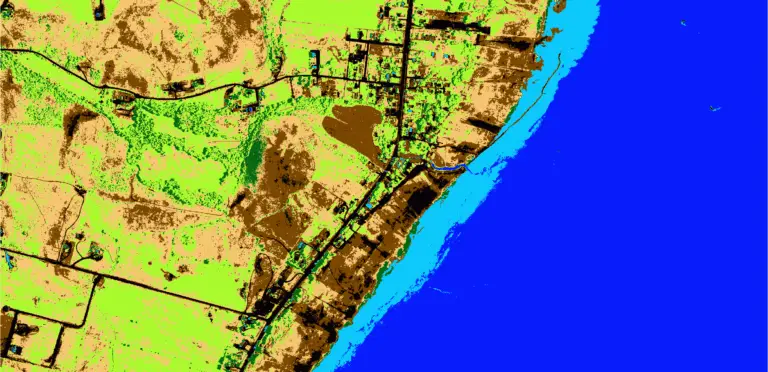
Layer with graduated symbology.