Mapbox Tutorial: Create Custom Web Maps for Free
Web maps are a great way to publish and share geospatial data. However, if you’re new to programming and web development it can be difficult to know how to manage, render, and serve your data on the web while also trying to partition and manage the web services you need. Fortunately, Mapbox provides a solution that lets you make beautiful professional web maps without worrying too much about data management and web services.
With the Mapbox JavaScript library, you can generate web maps using just a few simple lines of HTML code. You can also host your own data on your Mapbox account and include it in your custom web maps and applications. This tutorial will walk you through the basics of getting started with Mapbox. If you’re interested in a more complete Mapbox guide, check out our full course.
Connect to Mapbox Resources
The first step to create a web map with Mapbox is to link to the Mapbox CSS stylesheet and JavaScript library so they can be used in your HTML code. This is simple to do. We just need to start an HTML document and in the <head> section provide the link to these resources. You can find the most recent version of the CSS stylesheet and JavaScript library here.
If you are developing an application that will eventually be released it may be preferable to install the Mapbox resources alongside your application instead of linking to the URL (as we will do in this tutorial). You can follow the Mapbox installation instructions to determine the best option for your use case.
The code below demonstrates how to link the Mapbox stylesheet and JavaScript library by URL.
<html>
    <head>
        <title>Displaying a map on a Webpage</title>
        <meta name="viewport" content="intial-scale=1,maximum-scale=1,user-scalable=no">
        <link href="https://api.mapbox.com/mapbox-gl-js/v2.10.0/mapbox-gl.css" rel="stylesheet">
        <script src='https://api.mapbox.com/mapbox-gl-js/v2.10.0/mapbox-gl.js'></script>
    </head>
</html>
Create a Map
Now that the Mapbox resources are specified we can add some code to display a web map. Note that you will need a Mapbox access token to create a map. To get an access token you need to sign up for a Mapbox account. Don’t worry it’s free to sign up. Once you have an account copy a token from your access tokens page. You can generate multiple access tokens with different permissions if you wish. We’ll need the access token in just a minute.
Within the head tag open a style stage and style the body and #map elements so the map will display full width (see code below). The #map element is a div id we’ll create where the web map generated by Mapbox will display.
Now close the head and style tags.
Open the body tag then create a div tag with id="map" (as described above) and close the tag.
Now we’re to the meat of the code to create a web map. Mapbox uses JavaScript to generate its maps (the JavaScript library is Mapbox GL JS). Let’s open a script tag to start writing the JavaScript code that will generate the map.
We just need to do two things inside of the script tag. First, set your Mapbox token by assigning it to mapboxgl.accessToken. Second, create a variable for the map (here I’ve chosen the very creative name of map) and give it some settings.
To get a basic map there are two required values. First, container must be set the id of the div where the map will display (ours is map). Second, the style must be specified.
Mapbox has a number of styles you can choose from. For this example, I’m using the basic ‘streets’ style. You can browse other options in the Mapbox documentation.
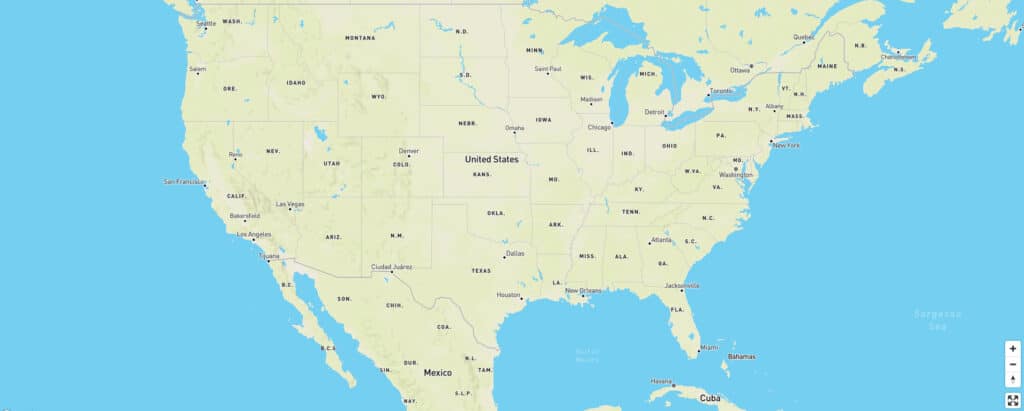
Once you have the container and style specified you can save the code and open the HTML file in a browser to display your map. I’ve included two additional settings: center sets the center point of the map, and zoom sets the zoom level of the map (higher is more zoomed in).
You can copy and paste the code below into your own HTML file to test it and make alterations, you’ll just need to include your access token for it to work. This code will generate a map like the image below the code.
<html>
    <head>
        <title>Displaying a map on a Webpage</title>
        <meta name="viewport" content="intial-scale=1,maximum-scale=1,user-scalable=no">
        <link href="https://api.mapbox.com/mapbox-gl-js/v2.10.0/mapbox-gl.css" rel="stylesheet">
        <script src='https://api.mapbox.com/mapbox-gl-js/v2.10.0/mapbox-gl.js'></script>
        <style>
            body { margin: 0; padding: 0; }
            #map { position: absolute; top: 0; bottom: 0; width: 100% }
        </style>
    </head>
    <body>
        <div id="map"></div>
        <script>
            mapboxgl.accessToken = 'your access token';
            const map = new mapboxgl.Map({
                container: 'map',
                style: 'mapbox://styles/mapbox/streets-v11',
                center: [-111, 32],
                zoom: 1
            });
        </script>

    </body>
</html>

Add a Marker
To add a marker to a map with Mapbox create a new mapboxgl.Marker() then call the .setLngLat() method to set the location, and finally use .addTo() to add the marker to the map. This code is all added inside of the script tag.
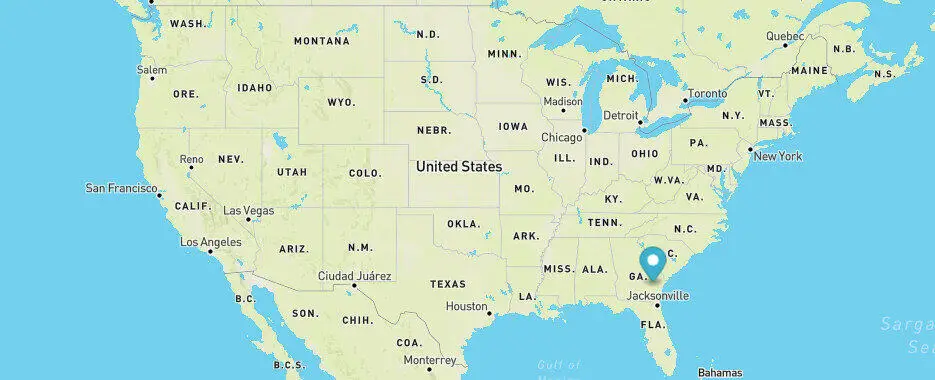
You can copy and paste this code to add a marker that looks like the one in the image below. The code creates a default marker at 82 degrees west and 32 degrees north.
            const marker1 = new mapboxgl.Marker()
            .setLngLat([-82, 32])
            .addTo(map);
For reference, the code inside the script tag should look like the block below.
        <script>
            mapboxgl.accessToken = 'your access token';
            const map = new mapboxgl.Map({
                container: 'map',
                style: 'mapbox://styles/mapbox/streets-v11',
                center: [-111, 32],
                zoom: 1
            });
            const marker1 = new mapboxgl.Marker()
            .setLngLat([-82, 32])
            .addTo(map);
        </script>
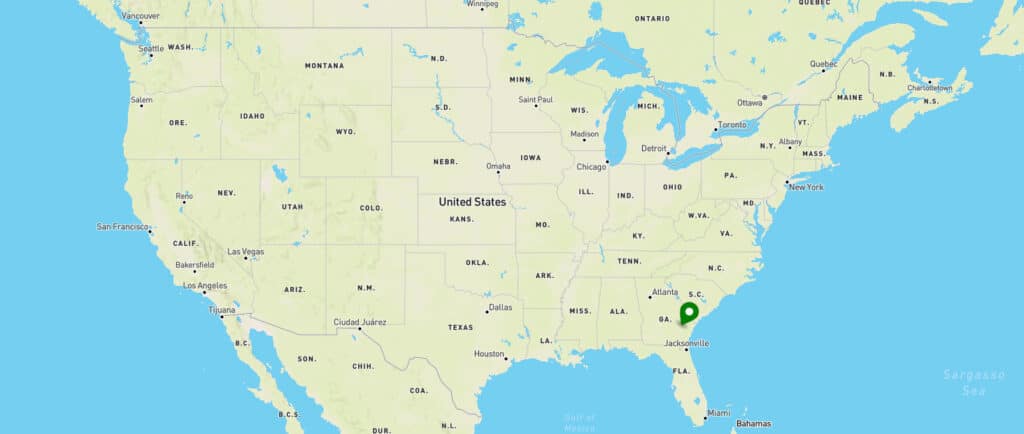
To change the color and/or rotation of the marker we can specify attributes inside of the Marker call. Let’s give values to the color and rotation attributes to make the marker green with 30 degrees of rotation. We’ll keep the same location.
            const marker = new mapboxgl.Marker({
                color: 'green',
                rotation: 30
            })
            .setLngLat([-82, 32])
            .addTo(map);
Save the HTML file and refresh the webpage to see the new results. As you can see, we’ve changed the marker’s color and rotation.
You can also use Mapbox to display lines and polygons on your maps. How to add these and other data types is covered in our Mapbox course.
Add Navigation Controls
You may want to add controls so a user can make a map full-screen, use buttons to zoom in and out, or reset the map rotation. We can use a little bit of code to add these navigation controls to our web map. The code is very simple. We’ll use map.addControl() to add fullscreen control and navigation buttons in the corner of our choosing. Just add the code below inside the script tag after map is defined.
            map.addControl(new mapboxgl.FullscreenControl(), 'top-right');
            map.addControl(new mapboxgl.NavigationControl(), 'top-right');
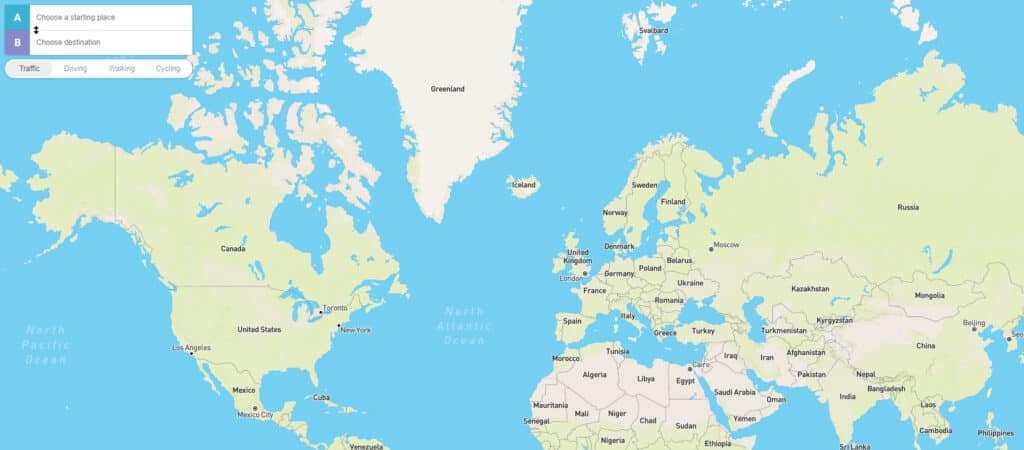
Get Directions to a Destination
Mapbox also includes functionality to allow users to generate directions from a start location to a destination (just like Google Maps or Waze). We can add this functionality using map.addControl() as we did above, but we first need to link to the Mapbox directions API. The directions API contains the code that will run when a user requests navigation directions.
To get the directions API we’ll link to the API and stylesheet inside the body of our HTML file. Then we’ll use map.addControl() to create a new MapboxDirections control panel on the map. You’ll need to pass the variable that contains your access token to MapboxDirections. The code below shows all the code inside the body tag and includes links to the directions API and associated stylesheet.
    <body>
        <script src="https://api.mapbox.com/mapbox-gl-js/plugins/mapbox-gl-directions/v4.1.0/mapbox-gl-directions.js"></script>
        <link rel="stylesheet" href="https://api.mapbox.com/mapbox-gl-js/plugins/mapbox-gl-directions/v4.1.0/mapbox-gl-directions.css" type="text/css">
        <div id="map"></div>
        <script>
            mapboxgl.accessToken = 'your access token';
            const map = new mapboxgl.Map({
                container: 'map',
                style: 'mapbox://styles/mapbox/streets-v11',
                center: [-111, 32],
                zoom: 1
            });

            map.addControl(
                new MapboxDirections({
                    accessToken: mapboxgl.accessToken
                }), 'top-left'
            );

            map.addControl(new mapboxgl.NavigationControl());
        </script>

    </body>
Adding Custom Data to a Web Map
With Mapbox you can also add your own data sources to a web map. The way to do this is to upload the data you want to display to your Mapbox account as a resource and set its permission level. A URL for your data will be generated and you can securely display your data in your own custom web maps. This process is a little more detailed than I have time to demonstrate in this article, but it is covered with video tutorials and code in our Mapbox course.
Other Things You Can Do with Mapbox
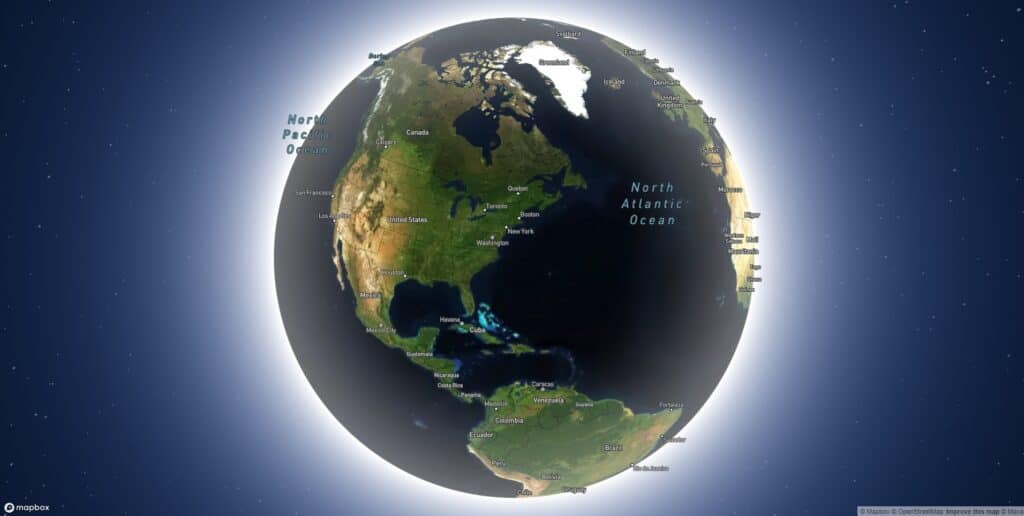
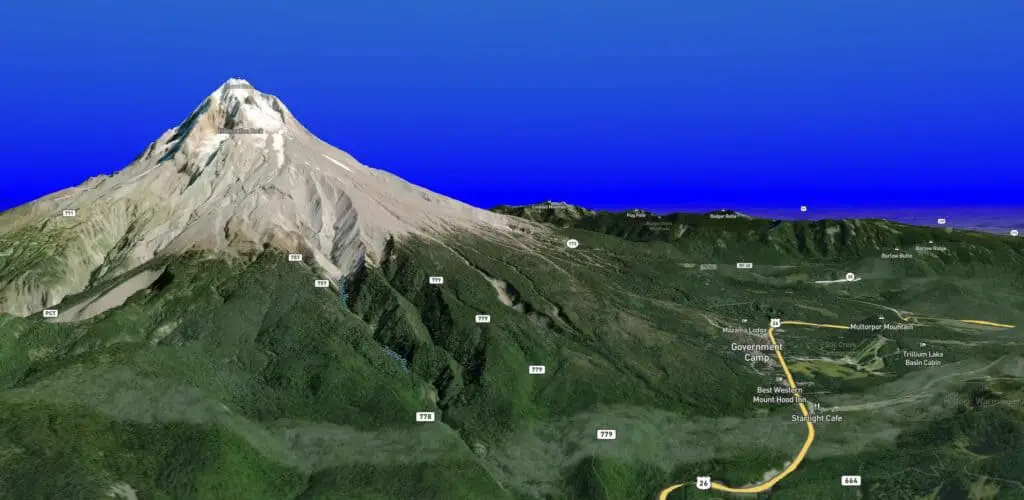
This tutorial has given a demonstration of how to create basic web maps with Mapbox GL JS. As you can see it is not difficult to quickly and easily start creating web maps. Mapbox also makes it easy to generate web maps that look like a globe and render in 3D (like Google Earth). You can also add free data that is available via WMS from third-party hosts. All of these are fully demonstrated in our Mapbox course.