QGIS: Clip a Raster Layer to an Extent
Clipping raster layers is a basic operation in many GIS workflows. Since rasters often cover large spatial extents, it is often beneficial to extract (or clip) only the portion of the raster that pertains to a specific study area. This can greatly improve data load and rendering times and decrease the time needed for tools and analyses to complete.
QGIS offers multiple raster extraction tools to clip a raster layer by extent or by a polygon feature. The Clip Raster by Extent tool clips a raster to a rectangular area, which can be defined by another layer, click-and-drag, or the extent of the map canvas. The Clip Raster by Mask tool allows you to clip a raster to a polygon.
This tutorial is also available as a video.
Load a Raster Layer
First, you’ll need to load a raster layer into QGIS. I’ve loaded in a merged raster that we created in a previous tutorial. Once your raster is loaded you’re ready to begin clipping.

Clip Raster by Extent
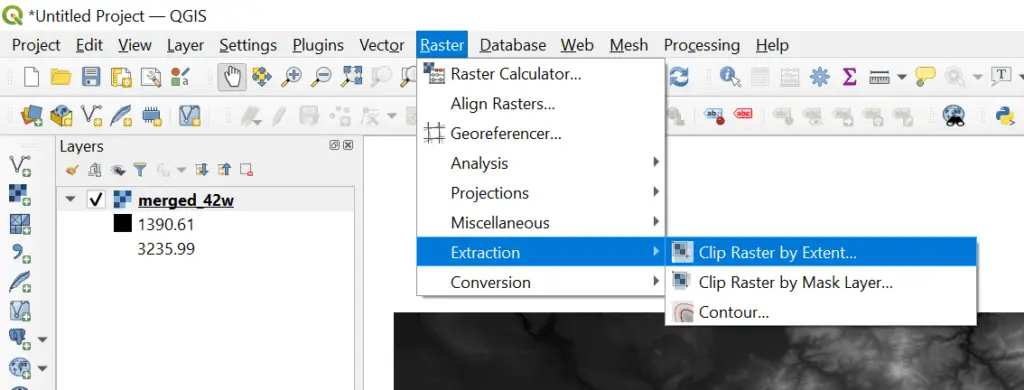
Open the Clip Raster by Extent tool. It is located on the QGIS Main Menu under Raster > Extraction.
Now you should see the Clip Raster by Extent dialog open in QGIS. Make sure the ‘Input layer’ field is set to the raster layer that you want to clip. In my case, this is the merged raster that I’ve already loaded into QGIS. If you haven’t loaded a raster into QGIS yet, you can select a raster layer from a location on your machine by clicking the ellipsis (. . .) next to the Input layer drop-down.
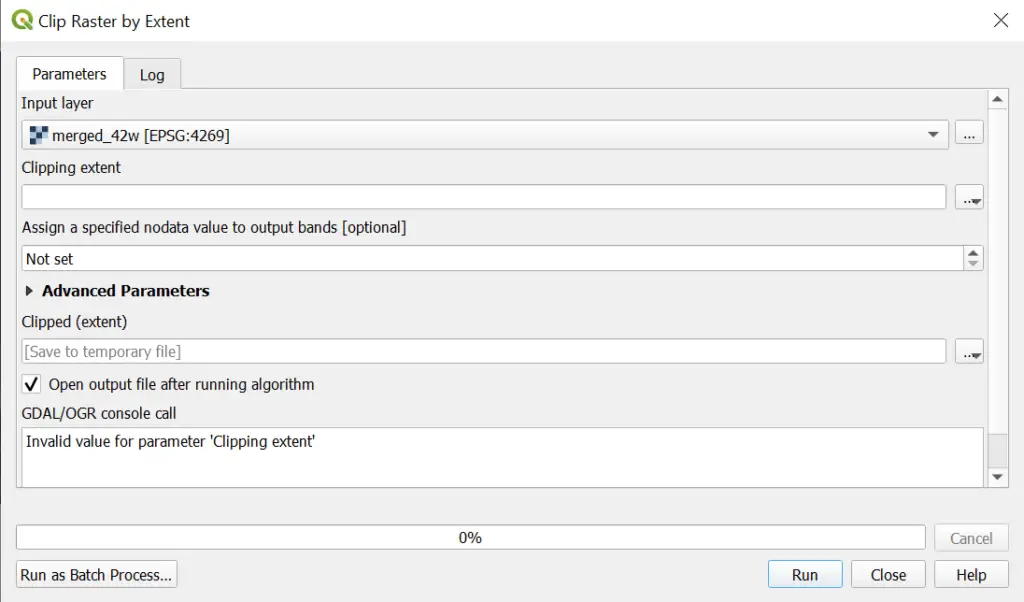
Next, we’ll need to define the extent we want to clip to. The Clip Raster by Extent tool will produce a rectangular raster as the output. To do that we need to specify maximum and minimum values for both X and Y. There are three ways to do this with the Clip Raster by Extent Tool.
Clipping Extent Options
If you click the ellipsis (. . .) next to the Clipping extent input line you will see three selectable options.
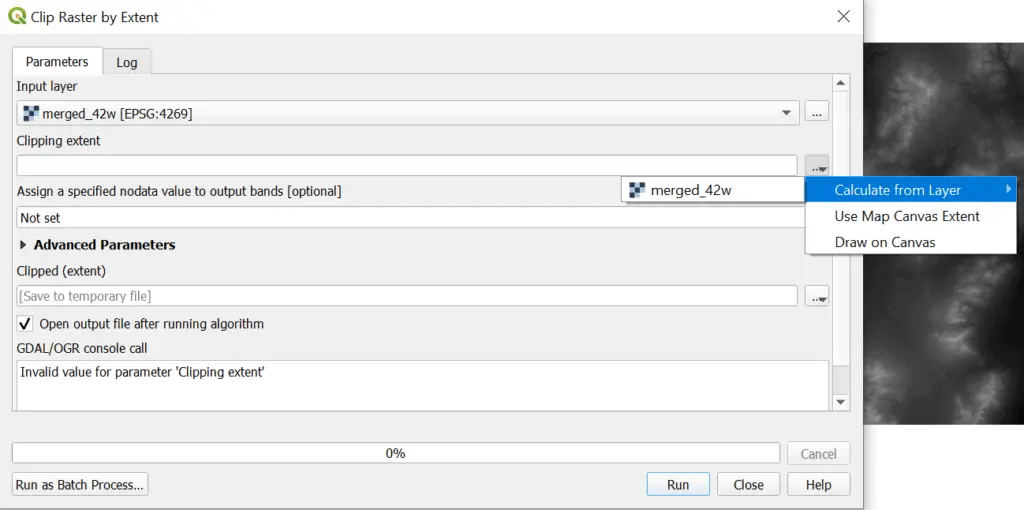
Calculate From Layer
When you hover over the Calculate From Layer option you will see a list of layers that are open in the QGIS interface. You can select one of the layers and the Clipping extent input will automatically be populated the minimum and maximum X and Y values for the features in that layer.
Use Map Canvas Extent
The Use Map Canvas Extent option will populate the Clipping extent with the extent that is shown on the QGIS map canvas. You can adjust the clipping extent by zooming in or out on the map canvas. After you do so, make sure you click the Use Map Canvas Extent option again for the extent values to update.
Draw on Canvas
You can also select a custom extent by using the Draw on Canvas option. Once Draw on Canvas is selected you will be directed back the map canvas with crosshair pointer. Click (and hold) and drag a rectangle to cover the area you want to clip. When you release the mouse click you will be directed back to the Clip Raster by Extent dialog and the Clipping extent will be populated.
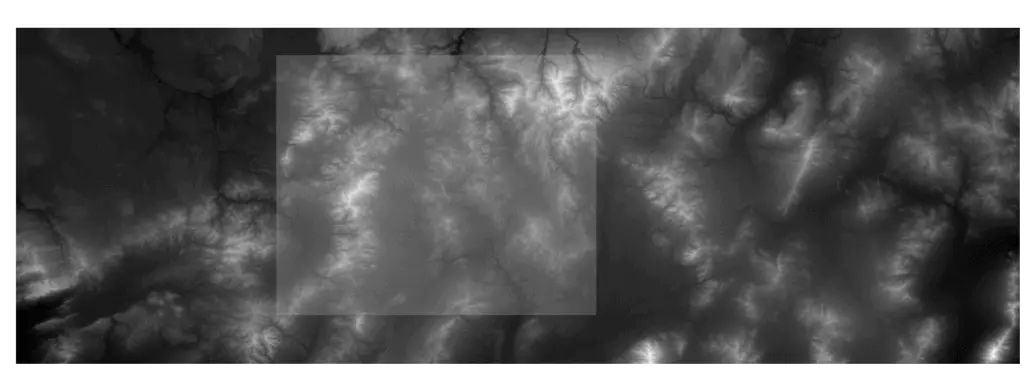
Run the Tool
We’re almost done. Now just select an output format and click run. If you get a black area with zero values where the original raster had no data values then add a value (0 or a number you know won’t appear in your raster data) in the ‘Assign a specified no data value to output bands’ input. This will make sure no data values transfer during the clip.
A note on coordinate reference systems (CRS) and projections. If you are getting strange output results from the clip it’s likely something to do with the CRS. It could be that the raster doesn’t have a CRS, or that the raster CRS is different than the project CRS. You’ll have to troubleshoot any of those errors on a case-by-case basis.
A note for power users. The ‘GDAL/ORG console call’ text box shows the Python code that can be run from the command line to accomplish the same task. If you are interested in batch processing with your command line scripts, you can copy and alter this code to make your job a little easier. It also make it easy to test things out in QGIS and then copy the code once you have a working example.
Conclusion
QGIS makes clipping raster layers quick and easy. I really appreciate the options to draw the extent or to use the map canvas extent. This makes it really easy to quickly subset your raster to any area you want without loading or creating additional layers. Clipping rasters is something you’ll probably do hundreds of times. After a few attempts, you’ll have this down without any issues.
Whether you’re looking to take your GIS skills to the next level, or just getting started with GIS, we have a course for you! We’re constantly creating and curating more courses to help you improve your geospatial skills.
All of our courses are taught by industry professionals and include step-by-step video instruction so you don’t get lost in YouTube videos and blog posts, downloadable data so you can reproduce everything the instructor does, and code you can copy so you can avoid repetitive typing

