Spatial Joins with QGIS Using the “Join Attributes by Nearest” Tool
A spatial join is operation performed on spatial vector data that links the attributes of one feature set to the attributes of the closest feature in a second set. The result of a spatial join is a new feature set (vector layer) that contains the attributes of both the input feature and the closest feature from the second dataset, along with information about the distance to the closest feature.
In QGIS a spatial join is performed using the “Join Attributes by Nearest” tool. Join Attributes by Nearest requires two input vector layers. For each feature in the first input layer (let’s call these target features) the nearest feature from the second input layer (let’s call these near features) is identified. The output vector layer is composed of geometry from the target features and attributes from both the target and near features.
This tutorial will demonstrate how to perform a spatial join in QGIS using the “Join Attributes by Nearest” tool and explain the tool’s inputs and outputs. A video demonstration is available at the end of this tutorial.
Input Data
For this spatial join example I’m using two types of vector data. Points and lines. The objective of this analysis is to determine which line is closest to each point and match the attributes from each point to the closest line.
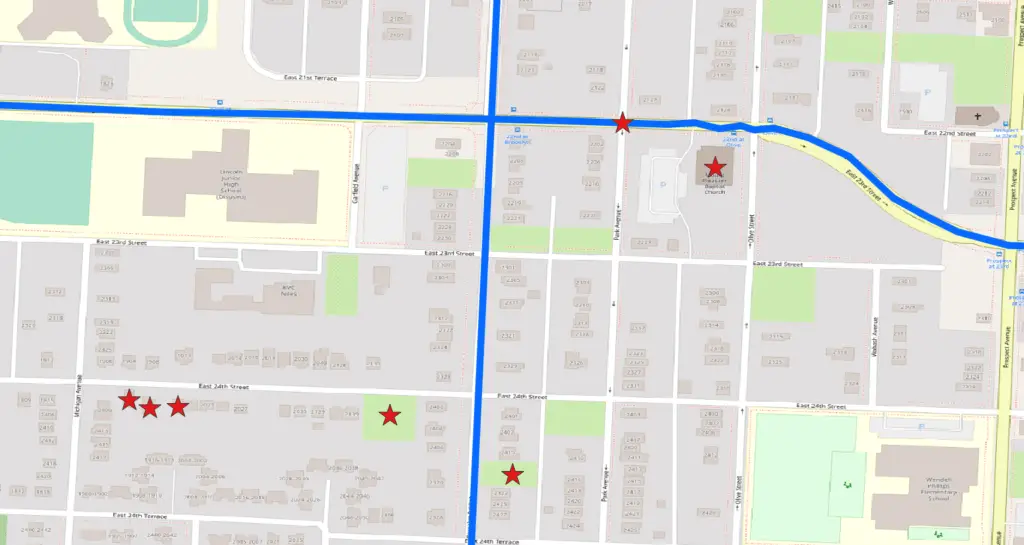
My point data (mypoints.shp) are displayed as red stars and represent buildings, parks and intersections.
My line data (mylines.shp) are displayed in blue and represent segments of two different roads.
The data used in this tutorial are available in the materials of my QGIS for Beginners course.
Perform the Spatial Join
In QGIS spatial joins are an easy operation to execute. It only takes five simple steps to create a spatial join.
1. Open the “Join Attributes by Nearest” Tool
To start, find the “Join Attributes by Nearest” tool. You can find the tool by using the search box in the bottom right corner of the QGIS interface.
The tool is also located in the QGIS toolbox, which can be accessed by clicking on the toolbox icon (a gear wheel) from the tool bar, or by selecting Processing>Toolbox from the main menu. Once the Toolbox is open you can search for the tool or access it in Vector General>Join attributes by nearest.
2. Select the Two Input Layers
Now select the two layers to use in the spatial join. It is important to know that the output will be the same type as ‘Input layer’.
For this example, I want to identify the attributes of the line closest to each point, so I want the output to be points. If I choose ‘mylines’ to be ‘Input layer’ (instead of ‘Input layer 2’) the output would be lines with attributes of the point closest to each line.
Getting the inputs in the correct order is the most important step to obtain a correct result.
3. Set Other Join Parameters
Once the input layers are set there are three additional parameters (two are optional) that can be adjusted.
- Joined field prefix (optional): This parameter sets a prefix to be added to the beginning of each joined field (i.e. column). For example, if I entered ‘newfield’ then ‘newfield’ would appear at the beginning of each field in the output layer that was added to the original fields in ‘mypoints.shp’.
- Maximum nearest neighbors: This is a required parameter that determines how many features will be identified for each feature. If the value is set to two, then there will be two rows in the output for each row in the input. The default value is 1. I recommend keeping the default unless you have a good reason to change it.
- Maximum distance (optional): This sets a maximum distance to search for the nearest feature. If no features from ‘Input layer 2’ are within the maximum distance of a feature from ‘Input layer’ then no output will be generated for that feature. It is important to pay attention to the coordinate reference system (CRS) when setting this parameter. It is recommended that a projected CRS (instead of a geographic CRS) be used when specifying a maximum distance, as noted by the warning shown in the image below. If the units are in ‘degrees’ (as below) then your CRS is geographic and should be projected before specifying a distance.
4. Set the Output Format and Location
Finally, set the output format. Here I’m generating the output in memory. In most cases you’ll want to save the output to a location on a drive. Select your desired output format and location.
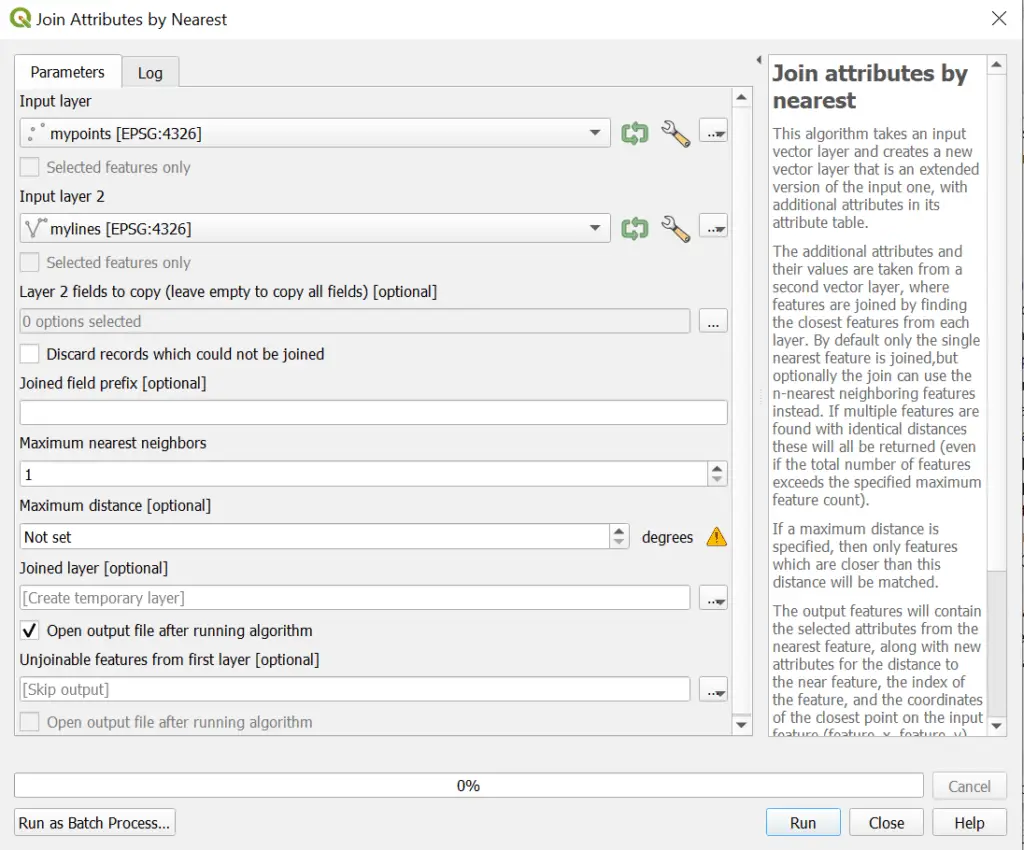
5. Execute the Spatial Join
After all the steps above are complete your are ready to execute the spatial join. Click the ‘Run’ button and the result will be generated.
Spatial Join Results
In the image below you’ll notice that the output features from the spatial join (green X) are at the same locations as the original input points (see image above). The main outcome accomplished by the spatial join was to add attributes from the road to the closest point (see table below).

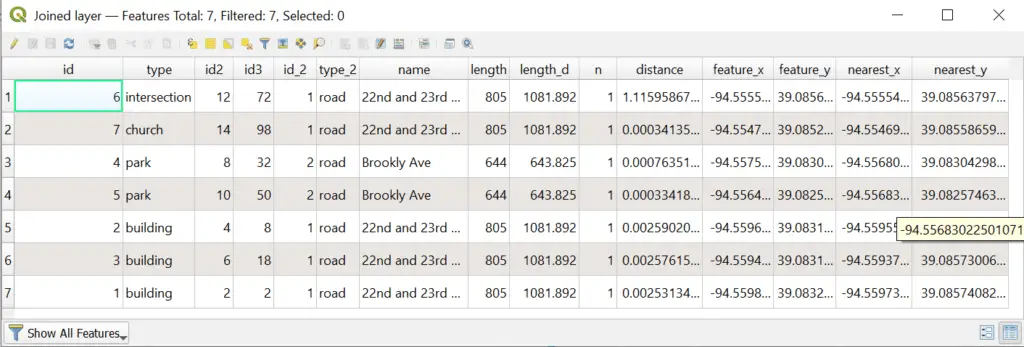
The attribute table below shows the primary results of the spatial join. The fields from ‘id_2’ to ‘length_d’ are the fields associated with the lines. You’ll notice these attributes repeat because the same line can be closest feature to many points.
Six additional fields are added to the attribute table as part of the spatial join.
- n: If the ‘maximum nearest neighbors’ parameter is greater than 1 n indicates which joined feature is closest to the target feature where a lower value is closer.
- distance: The distance from the target feature to the joined feature in CRS units.
- feature_x: X coordinate of the target feature.
- feature_y: Y coordinate of the target feature.
- nearest_x: X coordinate of the join feature location nearest the target feature
- nearest_y: Y coordinate of the join feature location nearest the target feature
Conclusion
The spatial join is a powerful operation that can be used for a variety of applications in multiple ways. QGIS implements the spatial join with the “Join attributes by nearest” tool. This operation is very useful for identifying spatial relationships between features and can even be used to move features to coincide with other features using the nearest_x and nearest_y fields that are generated in the join.
Whether you’re looking to take your GIS skills to the next level, or just getting started with GIS, we have a course for you! We’re constantly creating and curating more courses to help you improve your geospatial skills.

All of our courses are taught by industry professionals and include step-by-step video instruction so you don’t get lost in YouTube videos and blog posts, downloadable data so you can reproduce everything the instructor does, and code you can copy so you can avoid repetitive typing
Watch Video
Click below to watch a video demonstration of this tutorial.