Creating REMs and Detrended DEMs in QGIS
Have you ever seen those really awesome visualizations of rivers that are made with elevation data? You know, the ones where you can see the channels meander through the floodplain?
Those visualizations are made using relative elevation models (REMS), which are also known as detrended DEMs.
Visualizing data for rivers in GIS and map visualizations can be difficult because water flows downhill. This means there is always a longitudinal gradient along a river that makes it hard to see local elevation differences in rivers in relation to the broader elevation gradient.
REMS (and detrended DEMS) remove the natural slope of the river to visualize the river’s geomorphic characteristics. The idea is to make the bottom of the river channel have an elevation of zero. Thus, elevations outside the channel represent the height of a surface above the channel and can also be used for flood mapping (the method we’re using is not accurate enough for that).
The concept is simple, but it’s a little complicated in practice.
You can create relative elevation models (REMS), or detrended DEMs, in QGIS without any additional software. This tutorial will walk you through the process of creating a REM for a river step-by-step.
What I’ve done here is based on this post by Dan Coe Carto. I’ve made a few adjustments to make the process simpler and not require any extra plugins.
DISCLAIMER: REMs are frequently used for flood analysis. The IDW method we use herein is not accurate enough to produce reliable flood maps. However, these maps can still give an initial indication of which areas are likely to flood at certain water levels.

For this tutorial, I’m assuming you have basic QGIS skills. If you’re not comfortable with QGIS yet, DON’T WORRY. It’s not hard to learn and this course will teach you all you need to know (no experience necessary).
I post about new content to my email list. Sign-up and you’ll be the first to know and get EXCLUSIVE CONTENT.
Step 1. Obtain and visualize elevation data
To start you’ll need to have a digital elevation model that represents a river of interest.
If you don’t know where to start, I recommend the USGS Lidar Explorer. The United States has good lidar coverage and you should easily find an interesting river. The hi-res lidar will be great data to make a REM visualization.
Once you’ve obtained a DEM, add it to QGIS. I’ll be using a DEM for a portion of the Snake River that flows near/through Grand Teton National Park.
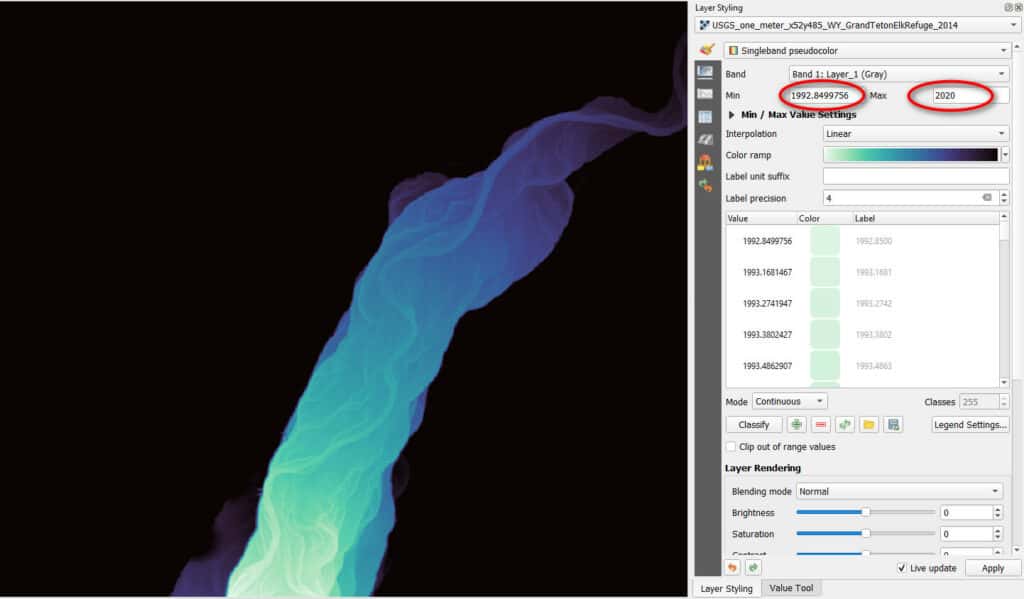
Visualize the DEM
In the QGIS layer styling panel (Main Menu > View > Panels > Layer Styling OR right-click on the layer, select Properties, then Symbology) change the rendering to Singleband pseudocolor and adjust the Min and Max values to roughly represent the minimum and maximum elevation values of the river channel.
You can use the Identify tool to click on the raster and get the elevation value of specific pixels (you can also use the Raster Value plugin). You don’t need the exact min and max values. As long as you adjust the symbology enough to see more detail in the river channels and valley bottom (like the image below).
Now, create a copy of the DEM layer. Right-click on the layer and select copy. Then right-click in the Layer/Table of Contents area and click paste.
Change the render type of the top layer to ‘Hillshade’ in the styling panel.
Increase the Z Factor so that the main river channel stands out. We want to see the main river channel to digitize it in the next step.
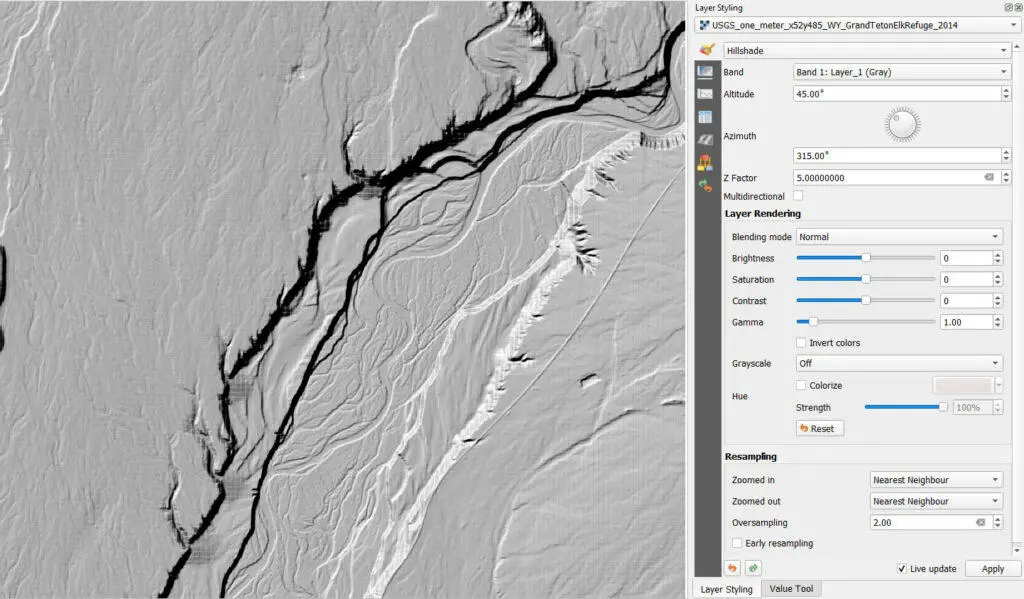
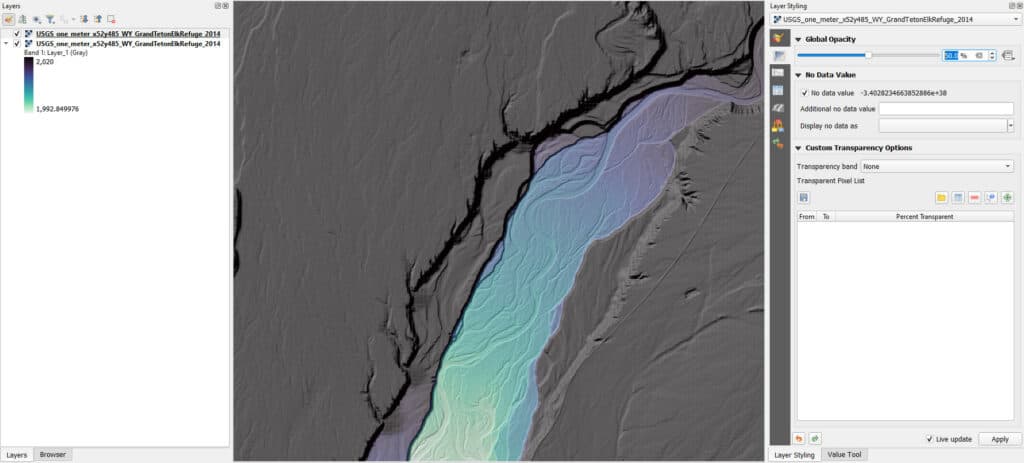
Once the hillshade is displaying as you like, decrease the transparency to around 50% so that you can also see the DEM symbology (see image below). This should help you identify the river channel.
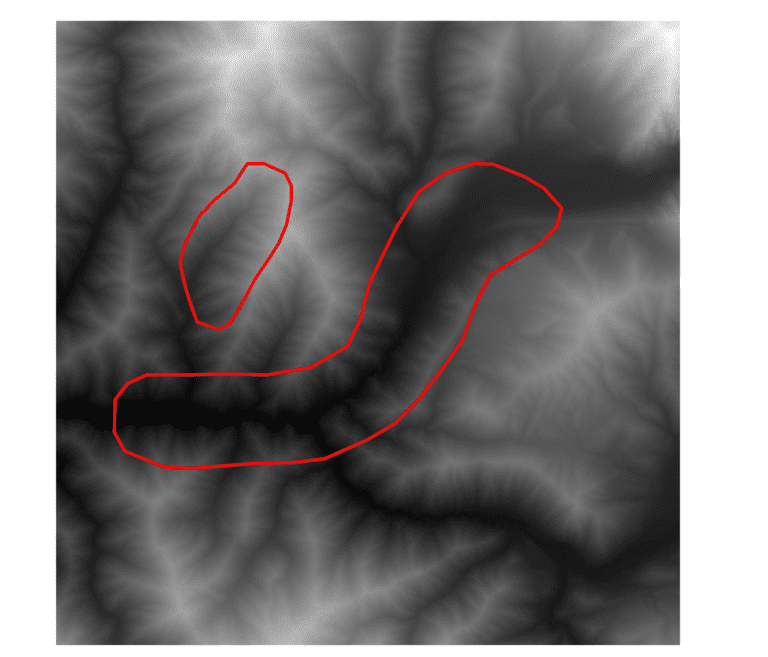
2. Digitize the river channel
Create a new vector file (any format works). Make sure the Geometry Type is a Line, LineString, or other line representation. Set the CRS to match the CRS of your DEM.
If the DEM was the first layer you added to the project then you can probably use the Project CRS (depending on your QGIS settings).

Once the vector layer is created, toggle on editing and create a new line feature.
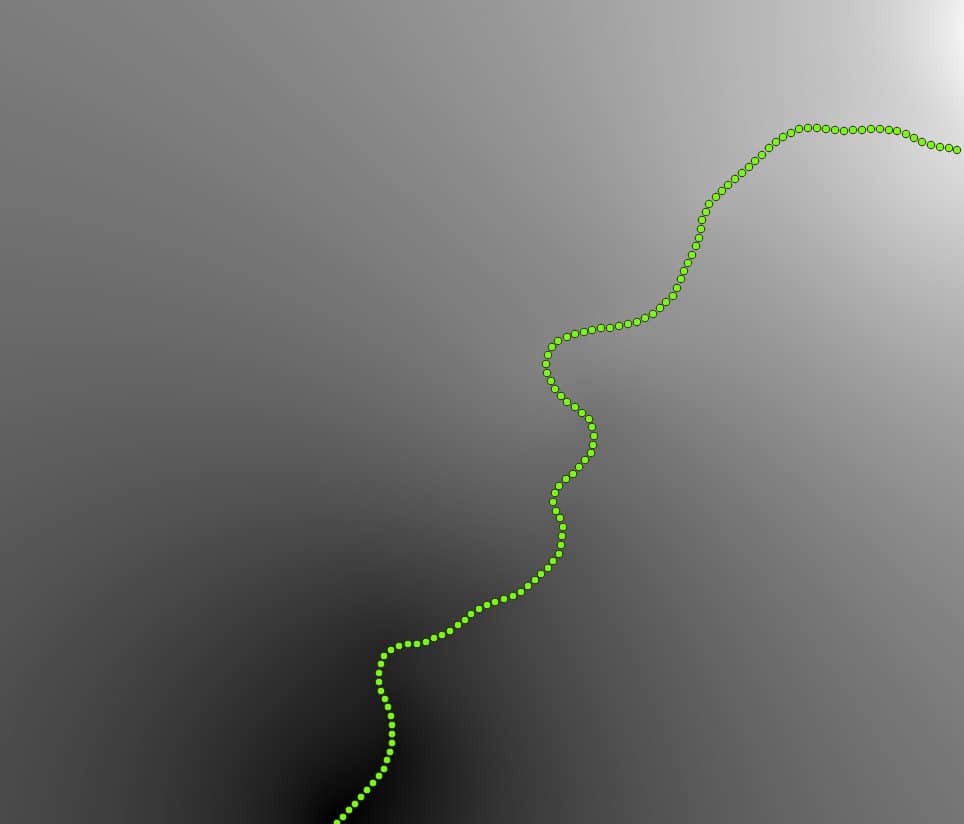
Now, create a single line feature that represents the main river channel in your DEM (see image below).
Now that we have a representation of the river, we need to get the elevation values that correspond to river locations to adjust our DEM and create a REM.
Step 3: Sample raster values along the river
The sinuosity of your river and the number of vertices you created will affect the quality of the interpolated elevation raster we need to create as an intermediate product for the REM.
To get good interpolation results, it helps to sample values along the river at an interval that is approximately equal to the channel width.
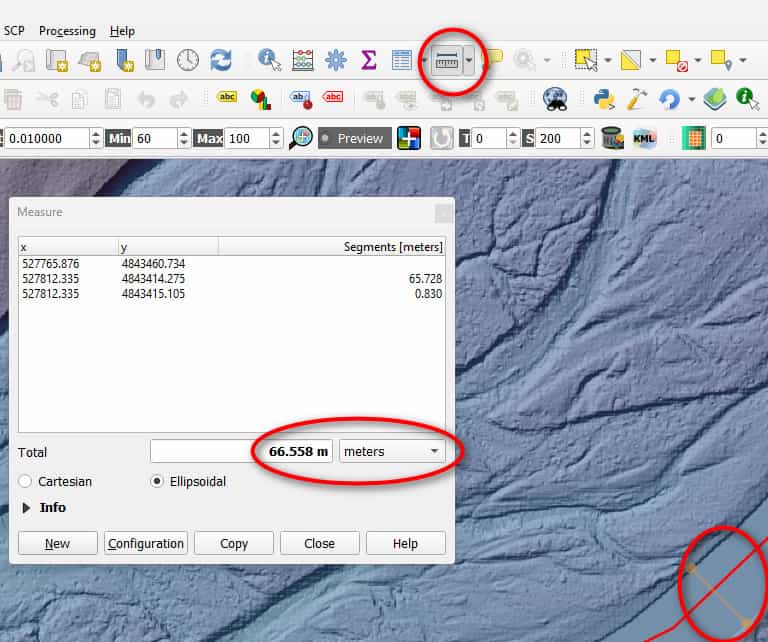
Use the Measure tool to measure the channel width at a representative location. My river channel was about 65 meters wide.
We’ll place points along the river centerline at channel width intervals with the Points Along Geometry tool. Open the tool from Processing Toolbox > Vector Geometry > Points Along Geometry.
- Set the river centerline as the input layer and the Distance as your channel width.
- You can save the output as a temporary layer or as a file.
- Click Run.
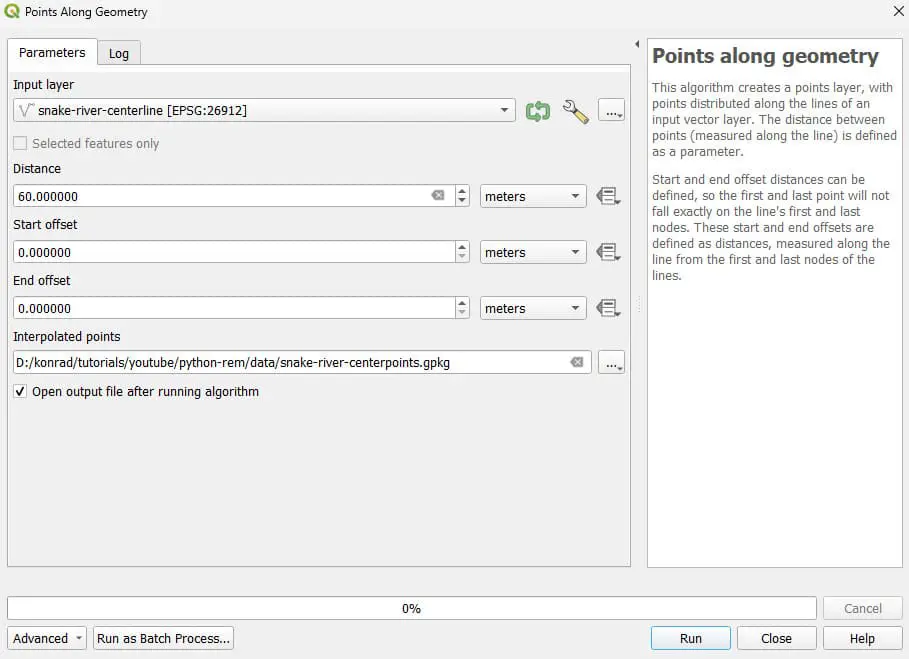
The tool will create a new point layer with points spaced evenly along the river centerline.
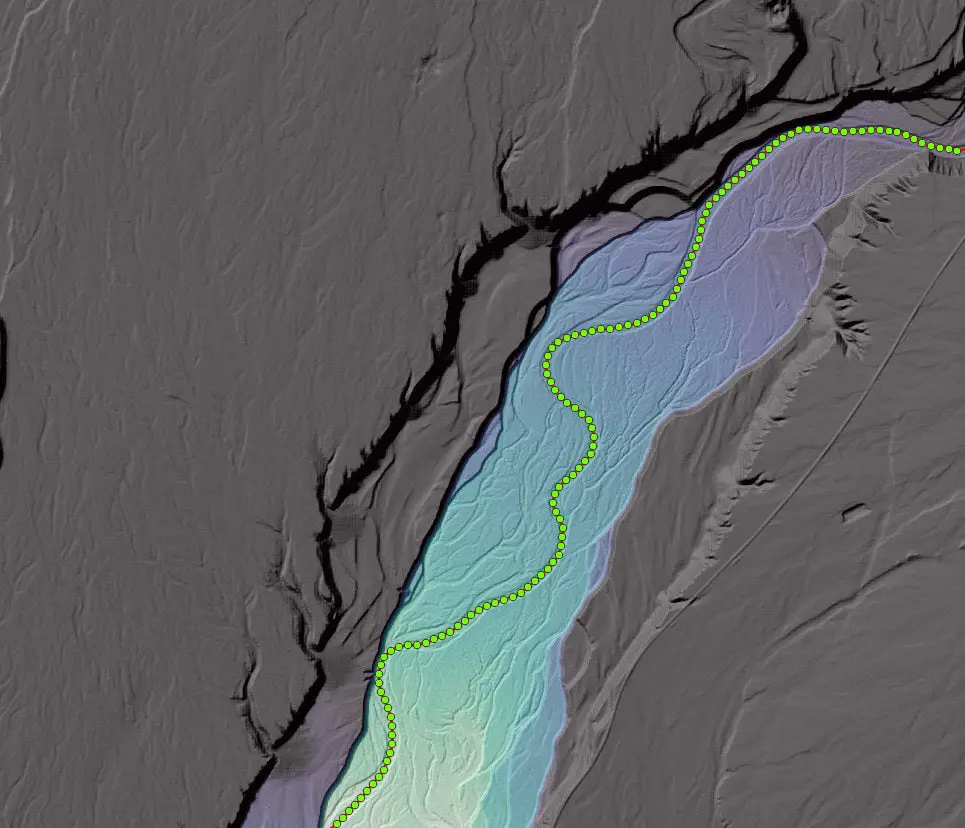
Now we need to get the river’s elevation at each of those points. We can get these elevations using the Sample raster values tool.
Open the tool from Processing Toolbox > Raster analysis > Sample raster values
- Set the river center points as the input layer (make sure you’re using a point layer and not the line layer).
- Set the raster layer as the original DEM.
- You can adjust the output column prefix if you like.
- The output can be saved to a file or as a temporary layer.
- Click Run
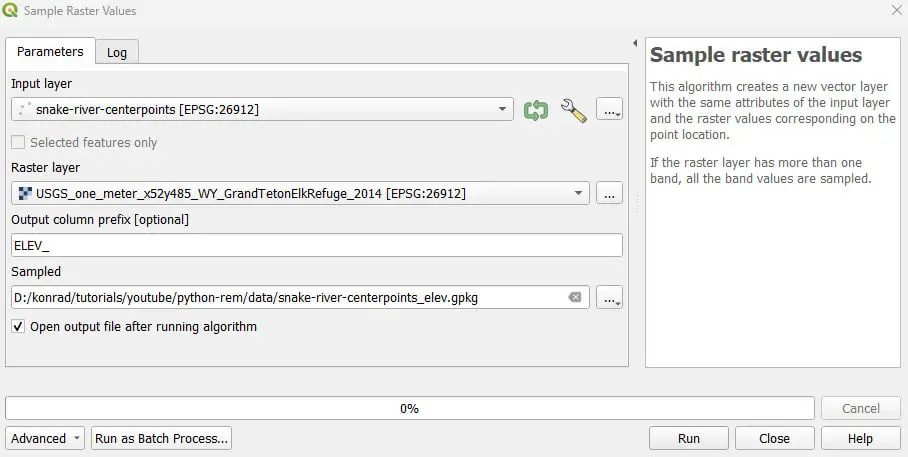
When you open the attribute table for the new layer, you will see that it has a column with the elevation of each point. We will use these elevations to interpolate the river elevation, we can then subtract the river elevation from the original DEM to get a REM, or detrended DEM.
If we take the elevation at the sampled points and subtract those elevations from the original DEM, we’ll get a value of zero. Essentially, this makes the elevation of the river bed 0 throughout the entire DEM so that all other elevations represent a height above the river channel.
The problem right now is that we only know the riverbed elevation at specific points. We need to know which river bed elevation is associated with unsampled points in the river channel. We also need to know which river elevation is associated with points on surfaces outside of the river channel.
Interpolation is the method we’ll use to approximate this.
Step 4: Interpolate river elevations
We’ll use Inverse Distance Weighting (IDW) to interpolate the river elevations from the center points to the full extent of the DEM. IDW takes a set of points and fills in gaps between points giving greater weight to nearer values.
Access the QGIS IDW tool from Processing Toolbox > Interpolation > IDW interpolation.
- Set the input as the centerline points with river elevations
- Set the Interpolation attribute to the field/column containing the sampled elevation values
- Set the extent from an existing layer. Select the extent of the original DEM layer.
- IMPORTANT: Set the pixel size to about 10x the pixel size of the original raster. The default pixel size may be extremely small and if not changed the interpolated surface will take a long time to calculate. This is a coarse estimation, we’ll resample the interpolated surface to match the original DEM in a later step.
- Save the output to a file or as a temporary layer.
- Click Run
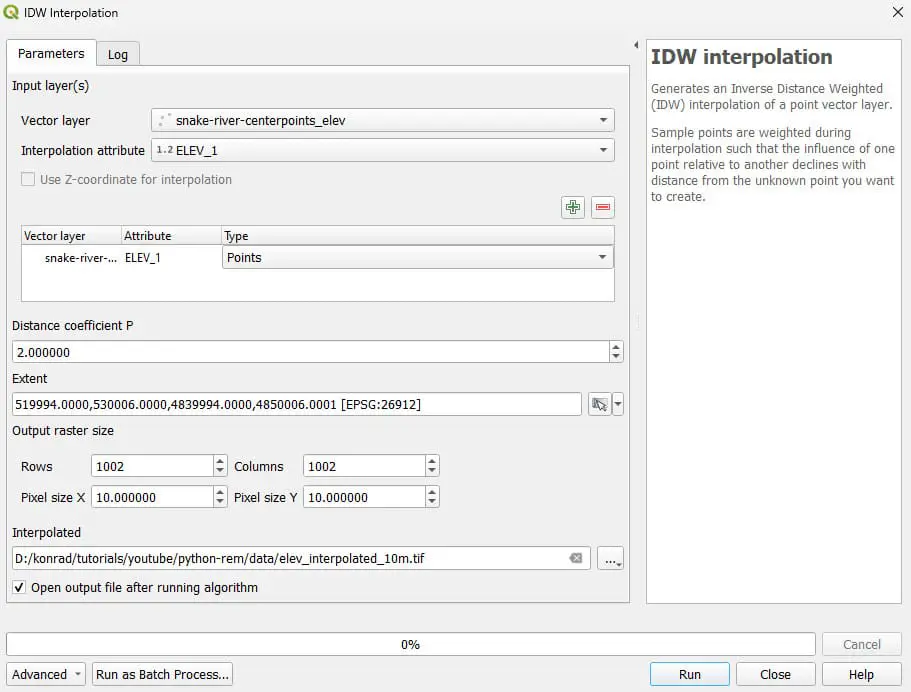
The interpolated surface should look similar to the image below. The highest values will be at the upstream end of the river and the lowest values at the river’s downstream end.
Now resample the interpolated raster to match the pixel size of the original DEM. This is faster (computationally) than interpolating to a finer grid.
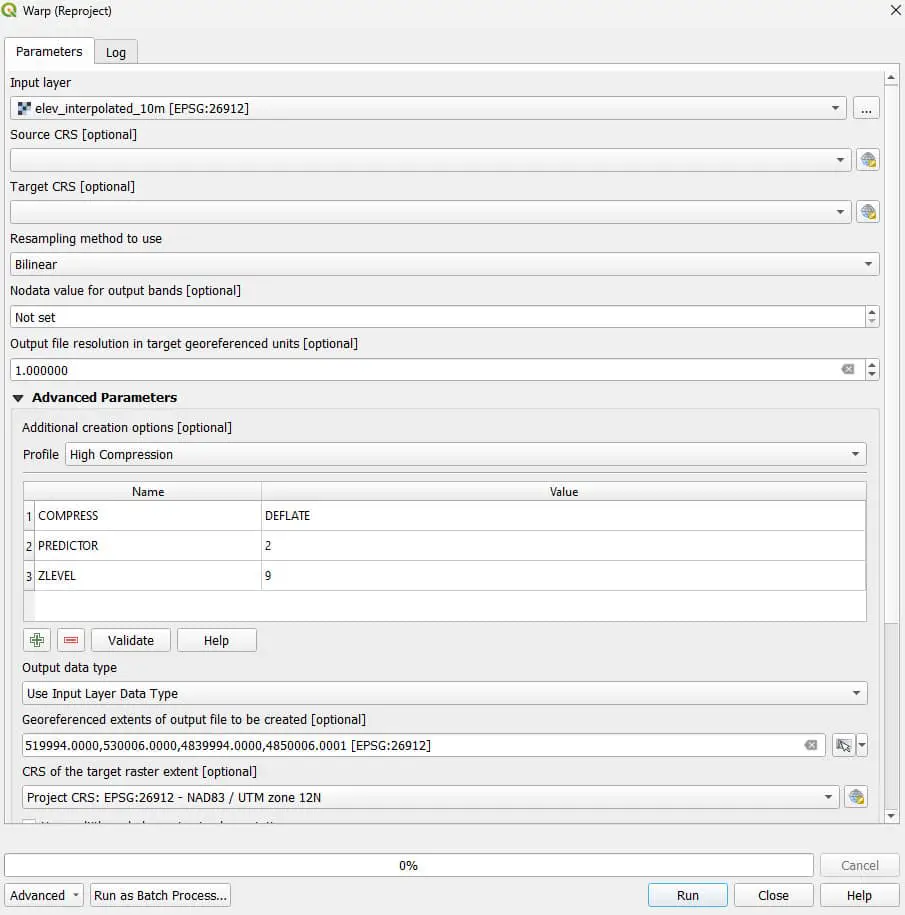
From the Main Menu access Raster > Projections > Warp (reproject).
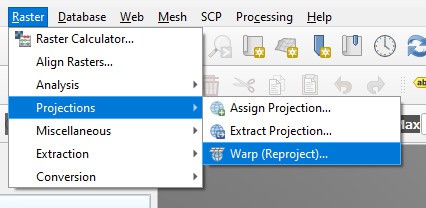
- Set the input layer to the interpolated elevation layer you just created.
- Make the resampling method ‘Bilinear’ (‘Cubic’ will also work).
- Set the output file resolution to match your original DEM (mine is 1 meter).
- Set the Profile to High Compression to save disk space.
- Select the georeferenced extent from an existing layer. Set it to match the original DEM.
- Set the CRS to match the original DEM.
- You can save the output to a file (recommended) or a temporary layer.
- Click Run
The resulting raster layer should look similar to the input, but its resolution should match the original DEM. This is the layer we’ll use to calculate the REM.
Step 5: Calculate the REM (or detrended DEM)
The final step is to subtract the interpolated river elevations from the actual DEM (original DEM – interpolated values).
From the Main Menu access Raster > Raster Calculator.
- Add the original DEM.
- Select (or enter) the subtraction operator.
- Add the interpolated river elevations (make sure it is the same resolution as the original DEM).
- Select an output file name.
- Click OK.

The resulting raster layer will be the REM or detrended DEM. Now we just need to visualize it!
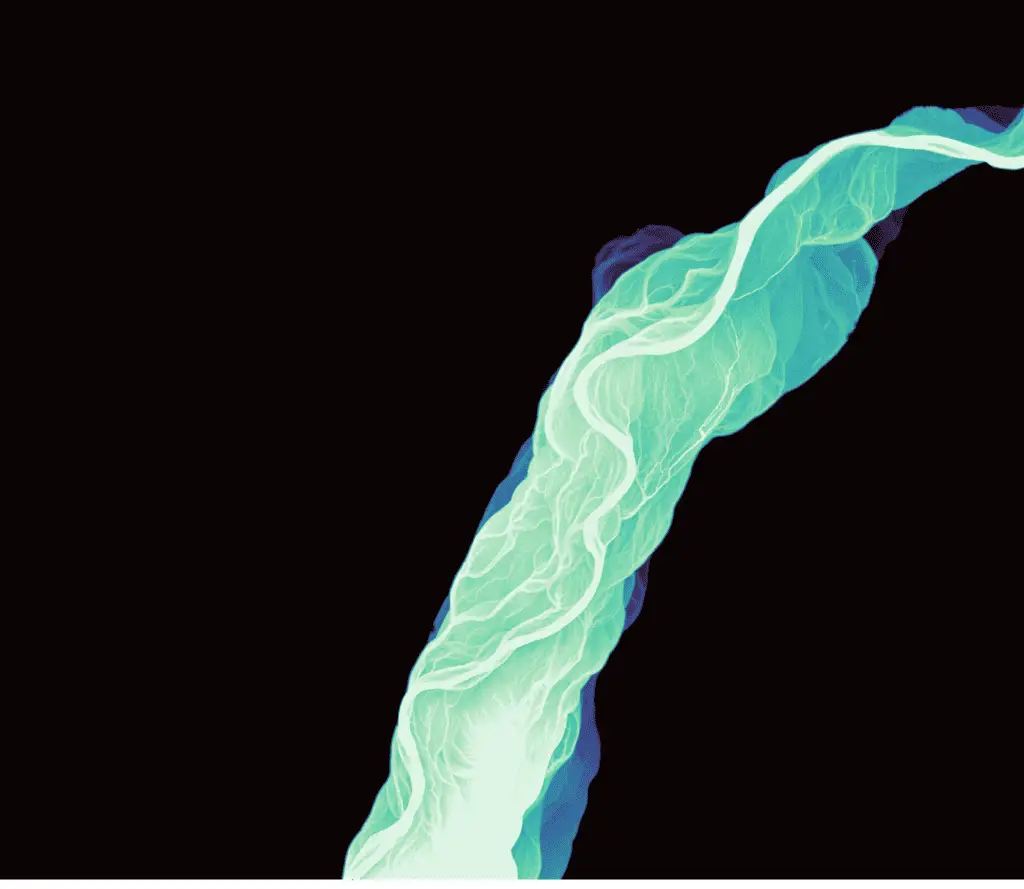
Step 6: Display and Visualize the REM!
Go to layer styling and change the render type to Singleband pseudocolor. Select a color ramp that ranges from light to dark. You may need to invert the color ramp (right or left-click on the graphic for the ramp) so that dark colors are associated with higher values.
Adjust the Min and Max values so that the minimum value is near 0 (I used -0.5) and the maximum value is around 10 (I used 12).
You should now be able to see the details of the river channel, side channels, historic channels, and other river features.
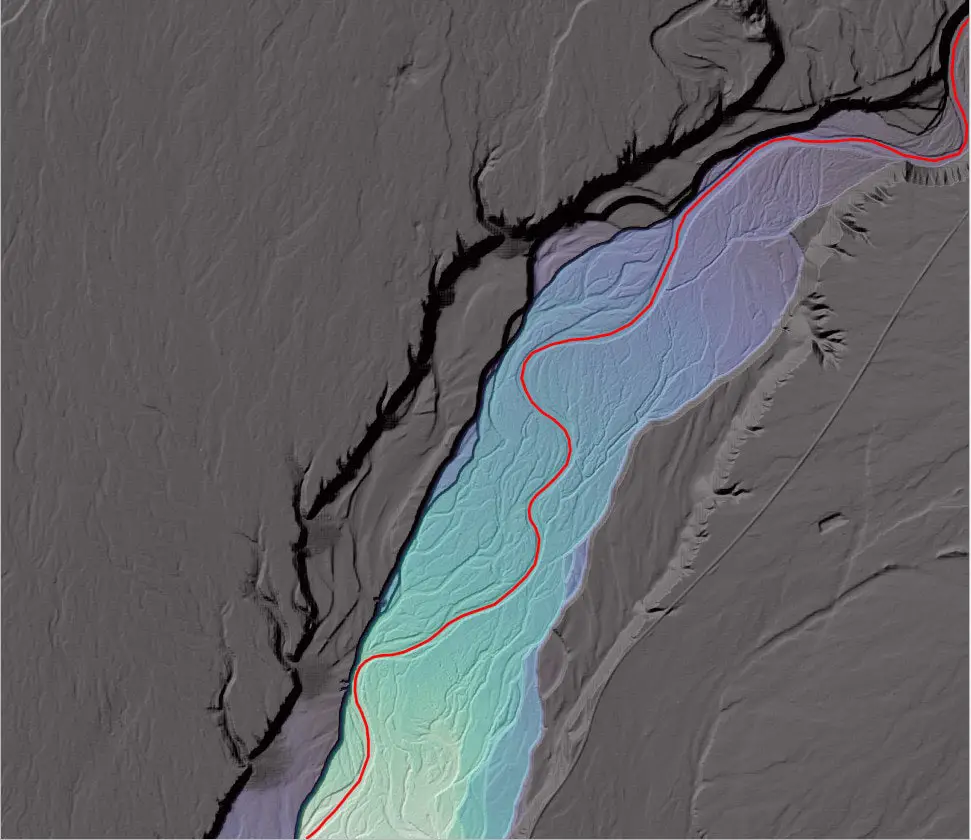
Additional visualizations can be made by changing the last interval on the color ramp to transparent to show a hillshade or imagery outside of the river area of interest (like the featured image for this article).
3D visualizations can also be made with QGIS 3D Views.
Now you know!
Now you can make a REM! This is such a useful tool for analyzing rivers. And it’s a great tool for making stunning maps. If you want impressive-looking GIS products, a REM or detrended DEM is a great way to showcase your skills and abilities.
You can learn more about QGIS analysis and projects and get EXCLUSIVE CONTENT from my email list.
A note of caution. REMs are frequently used for flood analysis. The method we’ve used here (IDW) does not produce a surface that is accurate enough for flood mapping, but it can give a rough idea of which areas might flood first.