Creating New Shapefiles in QGIS
A shapefile is a file format that represents geographic data in vector format. Shapefiles define points, lines, and polygons. The shapefile format was developed by ESRI and is frequently referred to as an ESRI shapefile.
Shapefiles are not the only way to represent vector data. Geopackages, GeoJSON, KML, CSV, and database structures also represent vector data effectively.
Here I specifically demonstrate how to create and edit shapefiles in QGIS.
How to Create a Shapefile in QGIS
Many tools create shapefiles. But often you will need to create a blank shapefile. This is easy to do in QGIS.
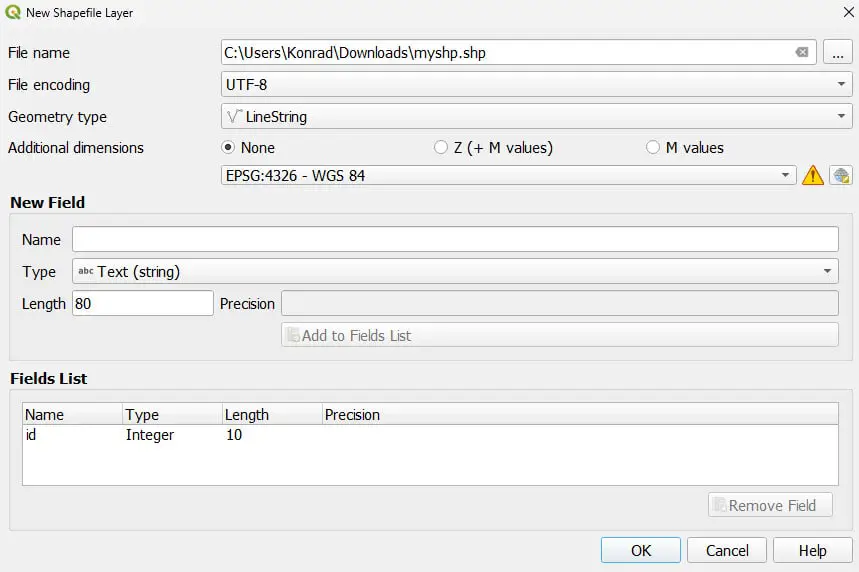
Use the “New Shapefile Layer” tool to create a new shapefile in QGIS.
- From the main menu select Layer > Create Layer > New Shapefile Layer.
- Set a file name for the shapefile.
- Choose a geometry type (point, line, or polygon).
- Select an appropriate coordinate reference system (EPSG: 4326 – WGS 84 is a good, generic choice).
- Add desired fields (i.e. columns). These will appear in the attribute table. You can always add fields later if needed.
- Click OK to create the shapefile.
This will create an empty shapefile that does not contain any features (see images below for how to create a shapefile). The next section will describe how to add features to a shapefile.

Add Features to a Shapefile in QGIS
Now that you have a shapefile, you’ll want to add features to it.
Use the “Digitizing Toolbar” to add or edit features in QGIS. It looks like the image below (but some options may be greyed out). If you don’t see it, add it to the interface from View > Toolbars.

- Click on the shapefile layer in the Layers panel.
- Click on the Toggle Editing button (pencil icon) in the Digitizing Toolbar
- Click on the Add *geometry* feature in the Digitizing Toolbar
- Left-click on the map canvas to create points (or vertices for lines or polygons). If you’re creating a line or polygon you’ll need to right-click to complete the feature (you can skip this step for generated values, or to make the value NULL).
- Enter information for fields as prompted.
- Click OK to save the feature.
- Select “Save Layer Edits” on the Digitizing Toolbar
- Toggle editing off.
Now you have added features to your shapefile and the features are saved to disk. You’ll be able to access the data and features in any program that can read shapefiles.
Other Ways to Create Shapefiles with QGIS
In addition to creating an empty shapefile, QGIS has other methods for importing data from other formats.
- Display geographic data in tabular files. In QGIS you can display geographic data from delimited text files (e.g. CSV). Select Layer > Add Layer > Add Delimited Text Layer. Specify the X, Y columns (or the WKT geometry definition column). Then click OK to add the data to the map.
- Create a shapefile from a different vector format. If you have a file in another vector format like geopackage, geojson, kml, etc. You can right-click on the file in the Layers panel and select Export > Save Features As. Then select the output file type as ESRI Shapefile.
- QGIS processing tools and plugins. Many processing tools and plugins create shapefiles with different representations given input parameters. For example, QGIS has several tools for creating random points in various ways.
Creating Shapefiles Using Python in QGIS
The QGIS Python API also supports the creation of shapefiles. The Python API is powerful because you can automate shapefile creation.
There are a couple of different methods for creating shapefiles with the Python API. The first is to write features directly to a file. That is demonstrated in the code below.
# create fields
layerFields = QgsFields()
layerFields.append(QgsField('ID', QVariant.Int))
layerFields.append(QgsField('Value', QVariant.Double))
layerFields.append(QgsField('Name', QVariant.String))

# set the file name
fn = 'C:/temp/newpoints.shp'

# create the shapefile
writer = QgsVectorFileWriter(fn, 'UTF-8', layerFields,QgsWkbTypes.Point, QgsCoordinateReferenceSystem('EPSG:26912'), 'ESRI Shapefile')

# create a feature and add geometry
feat = QgsFeature()
feat.setGeometry(QgsGeometry.fromPointXY(QgsPointXY(455618, 4632221)))

# set attribute values for the feature
feat.setAttributes([1, 1.1, 'one'])

# add the feature to the shapefile
writer.addFeature(feat)

# add the layer to the QGIS interface
layer = iface.addVectorLayer(fn, '', 'ogr')

del(writer)
In the second example, we’ll write features to a layer (in memory), and then write the layer to a file. This example also shows a different method for creating fields.
lyr = QgsVectorLayer("Point", "my_point", "memory")
id_field = QgsField("ID", QVariant.Int)
layer.dataProvider().addAttributes([id_field])
lyr.updateFields()

feat = QgsFeature()
feat.setAttributes([1])

point = QgsGeometry.fromPointXY(QgsPointXY(455618, 4632221))
feat.setGeometry(point)

error_code = QgsVectorFileWriter.writeAsVectorFormat(layer, "/path/to/shapefile.shp", "utf-8", QgsCoordinateReferenceSystem('EPSG:26912'), "ESRI Shapefile")
if error_code == QgsVectorFileWriter.NoError:
    print("Shapefile created!")
else:
    print("Problem with shapefile creation")
The shapefile will be created at the path you specified.
Now you’re an expert at creating shapefiles in QGIS! Go make some data!